Showing posts with label painting. Show all posts

Tuesday, March 24, 2015

Song of the Sea

I have a very good friend whose birthday is actually today (I should probably wait and post this tomorrow, after I've given this to her...nope, I'm not waiting!). Recently she took me to see the animated movie "Song of the Sea" - we both not only loved the beautiful visuals of the film but also the haunting Irish music. I wanted to involve the soundtrack for the movie with whatever I gave her as a gift, but online I could only find a digital download of the soundtrack for purchase. At first I was disappointed, but then I realized this was PERFECT - I would purchase the music and make my own personalized CD and CD case as her birthday present.

For the CD case I used a sheet of high quality watercolor paper which I measured, folded, and cut to size. The movie has lots of watercolor textures in it so I decided to take the ink and watercolor route with my artwork.

This photo was taken after I had started the inking process. It still needs more inking before I start painting -my friend loves dogs so although the dog isn't the star of the movie, he got a star spot on the front of this CD case!
More inking and I've started painting
More inking and more painting - plus I've unfolded the paper so you can see the start of my painting on the inside cover as well
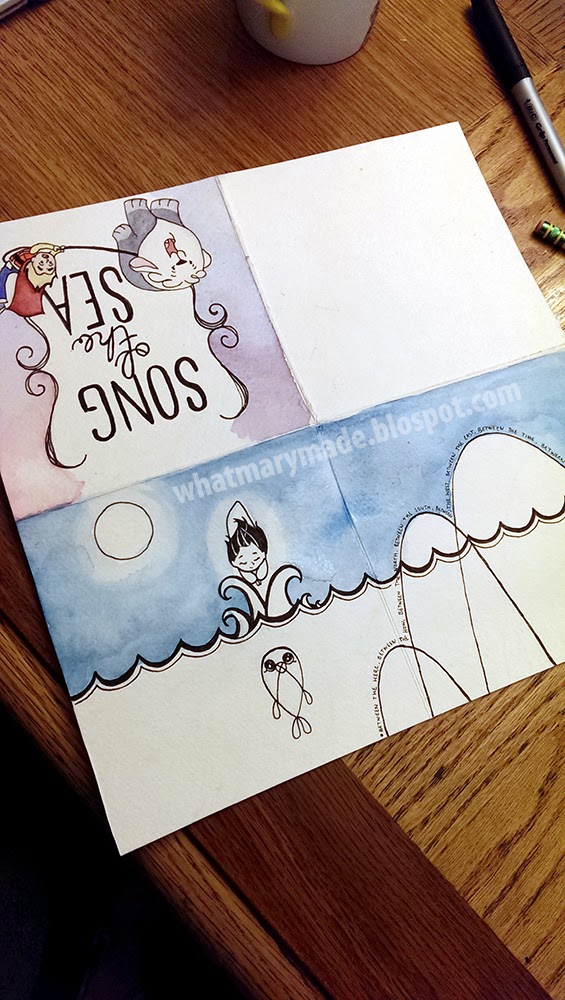
A view of the inking and and painting on the inside cover - this is the main character who is a selkie, a little girl who turns into a seal
After I've finished inking and painting - the CD case flat and unglued
After spraying the artwork to protect it, adding a ribbon, and gluing everything flat (I got to pull out my old bookbinding tools, it was fun!) - here's the finished CD case!!
Back of finished CD case with song list

Inside CD case with CD in clear plastic pocket (which holds it in place really well)

Inside CD case with CD removed - along the rounded top of the rocks I have written some of the words from the first verse of the movie's main song

I am really happy with how the CD case turned out - I had a lot of fun painting and inking and I think the end result is beautiful and unique, which is exactly what I wanted in a gift for my friend.

~m.d.

Monday, October 20, 2014

Ouran High School Host Club - Group Painting

My very favorite anime is one called Ouran High School Host Club - no other anime I've seen can compare to the perfect balance of silliness and storytelling that leaves you with a smile on your face.

I love ALL the characters on the show (part of what makes the show so great is how each character is explored and developed) and have wanted to do a group drawing of everyone for a while now. ESPECIALLY because official OHSHC artwork is usually bright pink and filled with roses or over-the top silly. . . not really to my taste.

For this blog post, I decided I should start with the finished piece and then jump to the progression photos - so here's the finished piece I created! It is a watercolor and ink painting that has been digitally retouched with a digital background added (original size 11x15:):


Now, let's go back and watch it come together.

After my recent success working with watercolor postcards, I decided to splurge and buy myself some large, high-quality watercolor paper. I've been out of watercolor paper for a while and the stuff I used to use was low quality and would curl (the watercolor postcards have been so nice because they're the high quality paper and I'd never previously used watercolor on paper that nice, it really makes a difference!!). I bought the pad with the specific idea of this piece in mind - I knew I wanted to start on it right away.

The first stage was penciling out the outlines I would later be inking over. I worked from several different reference screenshots from the anime, so I focused on different faces at different times.

faces start as lose circles or shapes to block out the space, then I go back and develop the face further with actual features
developing the faces and beginning to develop the shape of the bodies now as well

Because there are more characters in this piece than I've ever had in a single piece I've done before, I was surprised at how long the pencil work took me (I worked almost nightly for at least an hour, took about a week). I had to be pretty patient as it came together, so I was very relaxed about my drawing schedule and would watch random shows on Netflix as I worked.

almost done with my outlines!
After I finished my pencil work, I picked up my graphic pen (which I hadn't used on a piece before) and started tracing over my pencil lines.

I decided I wanted to add an inviting hand to the character in the foreground and ended up not finishing the pencil work on the last two characters on the far left until after I had done some inking

finished inking, including going back and thickening lines to create a sense of depth
Spent a couple evenings laying in watercolor paint - and some highlights in gouache:


The traditional art finished, I took a photo and in Photoshop made some corrections -for example, some of the heads in the drawing were actually disproportionate to the bodies, so I fixed that (probably the most obvious fix). Then digitally added a background and all finished!:

. . . in case you forgot, here it is all finished!
I went with a cooler color scheme as opposed to my usually warm palette, so this piece stands out color-wise from other work I've done (which is kinda fun).

All in all, I'm really happy with how it turned out :-)

~m.d.

Tuesday, October 7, 2014

Happy Birthday, Mom!

I struggled for quite a while trying to figure out what to give my mom for her birthday. Birthday gifts are hard, especially for someone I've been giving gifts to my whole life - that exhausts a few options as repeats ;-) And I love and appreciate my mom, so I always want to do something special for her. But she refuses to give lists or ask for presents, which makes it all the more challenging to come up with the perfect gift idea (silly mom, of course I'm going to give you a gift!).

Today is her birthday. This time yesterday, I still was struggling to figure out ideas as to what to give her. But as I was sitting at my desk at work yesterday, I realized I should do something with chipmunks. She LOVES chipmunks, and that just seemed like a good idea to go with.

At first I started browsing Etsy and picking prints of photos of chipmunks that I thought she'd like. But the more I thought about it, the more I realized our walls are already full of prints and photos and too much stuff for me to be picking something to take up more space. I needed something small. In fact, why don't I just make something small. . . and that's how I got the idea to create a painting for her.

I worked a 10 hour day yesterday so I came home really tired - but I was determined to get a painting done by the end of the night. I pulled out one of my watercolor postcards and my art supplies and pulled up a reference photo on my tablet. And got started. I didn't take progress shots because I was worried how it was going to turn out - I'm not very confident in watercolor so I was pretty nervous.

After about two hours (and pulling out my gouache to do some highlights), this was my result:

my little chipmunk - actual size is 4x6in.

I'm really happy - and frankly, surprised - at how well this turned out.

The green leaf  and twig were not in the original reference image but I felt like the composition needed that element to balance the piece. I like the touch of golden green too, especially as green is my mom's favorite color.

The piece took a little over 2 hours to complete from start to finish. I then went out at around 1am to buy a frame and a birthday card. This morning I sprayed the piece (to set it) and then put it in the frame. Ta-dah!

all framed and ready to gift!

I'm so happy. I went from no idea for a birthday gift to a beautiful, thoughtful one. I'm so grateful that I've been blessed with the talents that I have, and that they enable me to offer something beautiful of myself to those that I love. ♥ ♥ ♥

HAPPY BIRTHDAY MOM!!

~m.d.

Monday, September 22, 2014

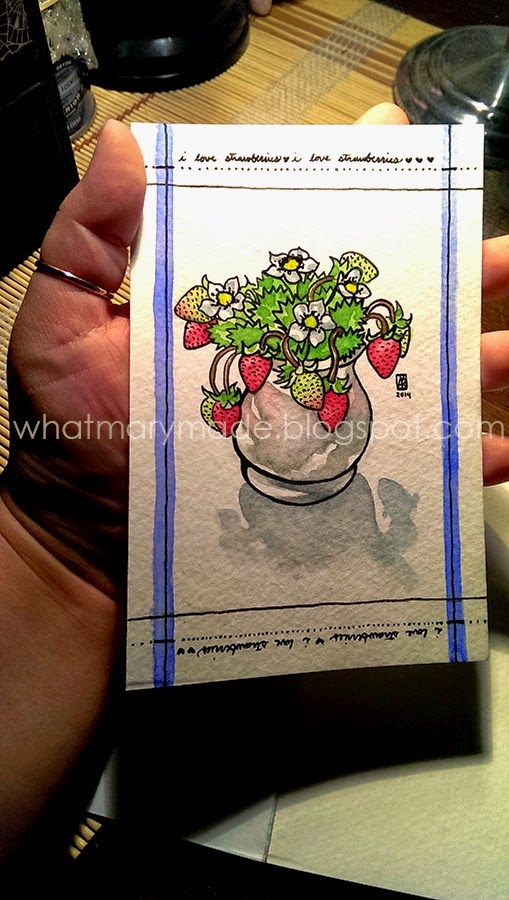
i love strawberries

My very talented friend Naisi loves working with ink and watercolor, and as I haven't really played in that world I was inspired by her work to take the leap and do some experimenting. My friend works mostly on watercolor postcards, so I bought a pack myself as well as some permanent ink pens in a variety of tip sizes. I already had the watercolors.

The first thing I did was some free play with the pens to get an idea of what effect I could achieve with the different tip sizes. Then I looked around my desk to figure out if there was something worth painting. If you remember, I created a little strawberry pot arrangement out of clay (I have a blog post and pictures here) and I've been keeping it on my desk - so I decided I would paint a picture of it!

I started out, as I always do, with a pencil sketch of the planter. Then, I felt confident enough with my pens to select a tip size to trace over my pencil work to create the ink outline for my painting.

inking over my pencil lines - usually when I do watercolors I will just do pencil and paint directly over the pencil lines

finished ink outline after pencil lines have been erased
I completed the ink work but it was several weeks before I found myself with time again for art (which was last night, I'd had a bit of a difficult weekend so I needed an escape).

My original intention was to play with salting the wet paint to create texture to represent the dimples on the strawberries. Unfortunately, the scale of my painting was too small for this technique to be effective. Instead, I pulled out one of my smaller tipped pens and drew in the dimples.


after painting in the ink outline

I decided after painting my original ink outline that the piece needed some kind of border to look complete. I sat and thought about it for several minutes, then just started with a simple line border and built on it from there.

the finished piece with border

me holding the finished piece for scale - this is under my desk lamp

the painting next to the model - it's about actual size!
I think I'm going to do a few more little paintings like this - I'm glad I tried the technique, it was a lot of fun!

~ m.d.

Saturday, January 4, 2014

Kikyo

This watercolor painting (with pencil showing through) I created mostly while I was down with a pretty gross cold. I had this image in my mind of the character Kikyo from the anime Inuyasha and felt committed to realizing my idea as well as I could.

The lineart took me forever to get just right - I'm grateful my sister Alicia can't help but be honest when she gives feedback, it helped me notice and fix a couple of issues ;-)


I plan to sell this as a print at Sakura Con - but I know it won't be a strong seller and I didn't create it with selling as my motivation.  This piece was more for me, more a challenge as an artist that I enjoyed. 

It reminded me of back in my early days of fan art, when I used to draw this character ALL THE TIME.

(here's one of the "best" Kikyo pencil drawings I did back in 2006)

It's fun seeing how far my art (and my Kikyo!) has come.

~m.d.

Inuyasha, Kikyo © Viz Media

Sunday, September 29, 2013

Black Butler fanart


My sister recommended a new anime for me to watch - one she'd heard of but hadn't actually watched herself called "Kuroshitsuji" ("Black Butler"). Since I enjoy watching random stuff in the evening to help me unwind, and since they had the series available on Netflix, I decided to give it a try.

After watching it, there are things I liked and things I didn't like about the show - the interesting relationship between a boy and the demon he's contracted to serve him did catch my attention and fascinate me throughout. The butler/demon character, Sebastian, may now be one of my favorite anime characters.

Since it's been a while since I created any new fanart, I let myself get inspired by the two main characters in the series - the butler (Sebastian) and the boy he serves (Ciel Phantomhive, pretty epic name right?). I had some other ideas I considered for a pose, but this one seemed to work out best so I went with it.

I decided to try an experiment and take a traditional approach with this anime fanart - create a watercolor painting. Often the manga (graphic novel) versions of these series feature artwork done in watercolors, so it seems an appropriate medium.

I took a couple of cell phone photos of the process that I thought I'd share:

 Pencil drawing before any painting. I debated inking my outlines but decided that I wanted to try for softer lines in this piece.

 After a few hours of painting. I started by painting in gum arabic to protect the areas I wanted the paper white preserved and filling in the flat coloring of the clothes and skin. Then I came back to add shading and blend it in.
I was frustrated because it turned out I am completely out of black watercolor - and painting "Black Butler," you kinda need black!! I had to mix my own black using what I had, so my blacks turned out . . .interesting. But not necessarily in a bad way.


The finished watercolor painting (with a few touches of white acrylic paint and ink)! Not the best photo of it- this photo was taken next to a dim artificial light with my cell phone camera, which doesn't do well capturing details.

After taking a better photo, I worked in Photohop on a few digital touch-ups to the painting. Then I added a background (which I created using several different elements) to create the final piece:


I actually am pretty proud of how this turned out - every time I do something with watercolor paints that doesn't look completely awful, I'm usually pretty proud :) Watercolors are hard! But this experience has encouraged me to try a few more fanart projects from this traditional approach. And I do have a few more ideas, too. . .

~md

Black Butler/Kuroshitsuj, Ciel, and Sebastian © Funimation

Saturday, September 14, 2013

D&D Figurine

Recently my brother started playing Dungeons and Dragons. He's really gotten into it - he purchased his own set of the dice, and then more recently purchased a figurine to represent his character in the game. When I saw it glaring white and plain, I asked him if he planned to paint it. At that moment his eyes lit up-  not because I'd inspired him to paint it, but he'd realized who he could ask to paint it for him . . .


The figurine is pretty small, standing at about 1 3/4." I was joking I'd have to use eyelashes to paint in the details!

Here's what the figurine looked like before I started - as purchased:


Lots of details in the sculpt, so I knew it'd be fun to paint - working to highlight those details.
After several hours of painting, I was finally finished. . . Ta-dah!


The shield was blank, so I decided to paint in a dragon-like design. I didn't have a brush fine enough to do what I really wanted, but it turned out looking really cool even though it's more of a fancy squiggle than a dragon.
When it came to colors, the only request my brother made was a green cape.

This picture helps show the scale:

After he dried, I sprayed him with several layers of a matte protective finish - hopefully he'll last through many "adventures" for my brother.


~md

Friday, November 30, 2012

Tea Partying is Hard.


Fanart for the show Adventure Time -  I want to try to do more art the traditional way (since I have been doing mostly digital stuff, other than pencil drawings), and this piece was the first step in that direction for me!


Acrylic, pencil, and watercolor on watercolor paper. Ah, it's been a while since I painted. . . *happy grin*


~md
Adventure Time © Cartoon Network